Wednesday, 9 October 2013

MITM Against HTTPS Sites


In the last post we have seen the basic working principle of https. We have also seen that http is not secure and can be easily intercepted on a network. So the basic question that arises here is: Is https secure? We know that facebook or gmail provides the https connection automatically but are you sure that you are secure whenever you are browsing these https enabled websites? Well the truth is you're not. You may be thinking that these websites provide a secure connection and that you dont have to worry about security. But that's not true. You have to manually make sure, each time, that you're using an https connection. This is extremely important if you are on a public network. Well, we are going to see why.

What can an attacker do? Well, he cannot crack the encryption key so easily. But he can still get around the https. Basically if the user is not using a bookmarked https page to begin with, he is vulnerable to this form of attack. The underlying problem is that many a times the connection is started as  an http connection. When you type facebook.com in the address bar, you are actually starting an http connection with facebook.com. The site then redirects you to an https page. However, an attacker, who is suitably placed between you and facebook.com, can modify this https redirection into an http redirection. The victim's browser will not show any certificate problems since it is connecting with an 'http' site. At the same time the attacker can start an https connection with the server and can use the credentials supplied by the victim to start his own https session with the server. 
For this tutorial I have set up a virtual machine of backtrack linux on a Windows host. Note that the network adapter is in the bridged mode so that the two OSes work exactly like two different physical devices. You can use your favorite distro, we will be using the tools called sslstrip,arpspoof(comes with dsniff) and tcpdump.


First,we forward all the incoming packets on port 80(http port) to port 10000. 10000 will be the default port sslstrip will listen on.


Now we launch sslstrip using this command and keep the terminal open:

sslstrip.py

Now we will enable ip_forwarding.This is important because you need to forward the packets once you do an arp poisoning, otherwise it will become a denial of service attack. Open another terminal and use the command below:


Now we need to search for victims.You can scan the entire network using nmap.
The command used is:
 nmap -PR 192.168.0.0/24
This will scan for the devices on my network with ip 192.168.0.0 (if you don't know your network ip, use the ifconfig command)

Here you can see the ip of my windows host. This was the output I obtained with the ipconfig command on Windows(just for a confirmation).


Now let's poison the victim with arpspoof. Issue the following command and keep the terminal open:


Here eth0 is my interface since its on a virtual machine (usually wlan0 for a wireless interface. Again, use ifconfig if you don't know your interface). 192.168.0.1 is the ip of the gateway.Usually the last byte is a 1.

Now all the packets the victim sends and receives will be routed through my machine. Now all I need to do is filter the traffic.Here I've used tcpdump. The command here filters the whole traffic for facebook login credentials. Open a terminal and use this command (keep the terminal open to capture passwords):

         tcpdump -i eth0 host "www.facebook.com" -A|grep "&email="
 
Using wireshark to capture post data will be handy if you want to write filters of your own.
Now when www.facebook.com is opened  from the host computer you can see an http login page instead of an https page.

Now give the credentials there and try logging in.

On going back to Virtualbox and examining the tcpdump capture, you can see the magic.


What you can do to avoid this situation is type in "https://www.facebook.com" instead of www.facebook.com. Another thing you can do is to keep the "https" page of facebook.com bookmarked and use it. That's it. Hope you've all understood why I told you to always make sure that you're using an https connection.


tags:-mitm, lan, against, https, sites, arp, poisoning, using, sslstrip, hack, facebook, public, network, use, backtrack

Friday, 23 August 2013

More Secure HTTPS

In the last post we have seen that a cracker can hijack your facebook or any other session easily if you are using an http connection. The problem with http is that data is send in plain text by both your browser and the server. So a cracker can intercept it and read its contents, or they can capture your session cookies and hijack your session. To increase the security of http, a more secure https is used nowadays. Here we will see what does the https do so that we can communicate securely with the server. Https encrypts the http messages using TLS(also known as SSL) protocol before transmitting it, Now only the receiver can decrypt it and hence the connection is secure. To fully understand the details of https you should understand the two types of encryption used:-symmetric & asymmetric encryption.
Symmetric Encryption: Here using a secret key(only the sender and receiver know it) the sender encrypts his message and transmits it. On receiving the message it can decrypted it using the same secret key.
Asymmetric Encryption: Here the a pair of keys are used, a private key and public key. If the data is encrypted into a cyphertext with the public key then it can be decrypted into plaintext only using the private key and vice-versa.
Hash: A hash is an "almost unique" fixed length string produced by an algorithm taking varying length data, it can be noted that a small change in data most probably changes the hash by a large value.

To start communicating securely, the client and server should have to complete an ssl handshake. It consists of the following steps.

1. The client(the web browser) first sends a "client hello" message which contains information about the encryption techniques that can be used.
2. The server sends a "server hello" message which consist of the encryption algorithm choose by it and also a digital certificate along with it.
 3. The browser verifies the certificate by checking the digital signature present in it and if finds genuine,  extracts the public key from the digital certificate and uses it to encrypt a random symmetric key and sends it to the server.
4. The server decrypts the symmetric key and using its private key associated with the public key sent. Now own the connections will be encrypted and decrypted using this symmetric key.

SSL certificate of facebook.com
So the client and server can communicate using https connection securely over the internet. This connection is secure because they are only parties who know what the symmetric key is.The need of using a symmetric key is it makes encryption-decryption much faster than an asymmetric encryption.
Now the question is why cant a cracker do a man-in-the-middle attack by tampering the public key present in the certificate with his own? The working of digital signatures will tell the answer. Each browser consists of a number of built in ssl certificates, these are signed by trusted authorities like verisign, (in firefox you can see them in the preferences) these certificates also contains the public key of the authority.


Now, as the certificate obtained in the handshake contains a signature. Browser can check the integrity of the signature. Actually the server have to send its certificate to the certifying authority to get it signed, certifying authority hashes the certificates and encrypts the obtained hash using its private key. Now when the browser receives the certificate it hashes it and decrypts it using the public key present in the pre-installed certificate of the signing authority. Now if the hashes match then then the certifying authority can be trusted and browser goes on and complete the handshake. If the hashes dont match or the certificate is found to be invalid then an ssl error message will be shown immediately to the user. Hence an attacker cannot come forth with  a self signed certificate as it dont have the private key of the signing authority.
An SSL error message on Firefox
If you encountered a message like this it is strongly recommended that you should not continue.
But on a good ssl connection, as long as you can trust the installed certificate on your computer, you are safe and secure.
Problems can also arise when you dont really check if you are connected using an https connection. If the connection was started as http(like when you type in "facebook.com" on the address bar), mitm attacks can be done by limiting the connection to http itself. We will look into the details of it in the next post.


Tags: working https ssl handshake tls encryption certificate digitel signature public private key encryption.


Saturday, 27 July 2013

Sniffing HTTP On A LAN, MITM Attack


Have you ever wondered why you are always recommended https connection instead of http? This article will demonstrate how one can hijack your session easily if you are using an http connection to log into a website. I saw my friend on my LAN using http connection to browse facebook, the secure browsing in the facebook privacy settings wasnt enabled , and i wanted to show him his session can be hijacked. Since facebook home page is available only in https his login credentials cannot be captured, but after logging in, the connection changes into an http connection and one can hijack his session by capturing the session cookies.

Basically the problem with http connection is that data is sent and received in plain text. As this data has to pass through a number of routers if somebody want to manipulate it, they can do. Or they can simply do a Man-in-the-middle attack and capture your cookies to hijack your session. This tutorial will show you the ease with which one sitting on your LAN can hijack any of your account if you are using http an connection.
Here we will use an Ubuntu machine loaded with arpspoof and tcpdump. Tcpdump is present in ubuntu by default. A firefox plugin tamperdata will be used to edit the cookies.  Arpspoof comes with the package dsniff. You can install it using the command below
sudo apt-get install dsniff
 
In the previous post we have seen how to cut somebody's internet connection on a LAN. There we have poisoned the arp-cache of the victim and gateway with mac addresses which does not exist on the network. But here we will poison it with our mac address. Here we send packets to gateway saying that the victim's mac address is that of ours. And also to the victim saying that the mac address of gateway is that of ours. And now all the packets sent by both the gateway and victim will pass through us. And we can examine these packets by using tcpdump.

Before starting the attack you need to take note of a few things, they can be found using the the command ifconfig. Press ctrl+atl+t, this will launch you a terminal there use the command ifconfig

Here you need to note your interface, (mine is 'eth0'). And your network ip, (mine is 192.168.11). These values are used later replace them with yours. 
To do a mitm attack you can find all the alive hosts in your network and choose one(or all), here is a small bash script for that using the ping utility
If you dont know how to execute it go here and learn. After executing it you will see the ip addresses of the machines who are currently alive.

You need to enable ip forwarding in your machine, it can be done using the command
sudo sysctl -w net.ipv4.ip_forward=1
 Then you need to poison the victims arp-cache, for that we can use the command sudo arpspoof -t 192.168.11.200 192.168.11.1
Here 192.168.11. is the ip address of my network and 200 is the ip of the host i am going to attack.  192.168.11.1 is the ip of my default gateway, usually it ends with a 1 after your network's ip. After executing this command with proper values you need to open another terminal. And monitor the traffic going through your machine, this can be done using tcpdump. You can always filter out cookies using the grep.
So if i want get the facebook cookies then i will issue the command
  sudo tcpdump -i eth0 -A|grep "Cookie: datr="
Since 'datr' is a facebook cookie i will get the output filtered and will only contain facebook cookies. You can drop the datr to get cookies of all the sites or replace it with the cookie of some other site.  Note that here eth0 is my interface, you should replace it with yours. So i managed to get my friends cookies.

To use it i copied it and opened firefox and used a firefox-addon tamperdata.  Tamperdata can moniter the http traffic between firefox and server and also it can be used to edit cookies on the fly. So i visited www.facebook.com and used tamperdata to replace the cookies with the captured one.
And on the fly i got his home page, and my friend was amazed and could'nt believe it.

Here if we want to browse the victims account. We need to edit his cookies for each request. Instead if the attacker used some cookie editor add-on which is easily available online he can really browse it just like his own account. If this sort of mitm attack is combines with a Dos attack, the victim cannot really log out of his machine, he may clear his cookies from the browser thinking it is safe but this makes it worse his account is "permenantly hijacked" as he cannot log out and the attacker can use the same cookies. 


Friday, 12 July 2013

DOS Attack By ARP Poisoning


In the previous post we have been discussing the arp protocol (if you havent read it go here and read it) we saw theoretically how one can poison other's arp table on his LAN and disconnect him from the Internet. Here, you will see how one can cut others internet connection on a LAN.
We will use a tool called nemesis on a linux machine, the download link is given at the bottom. Nemesis is a packet injection tool, means you can create forged packets using it.
Usually the OS automatically replies for arp requests, the kernel usually fills the header with the correct values and automatically sends it. But with the help of nemesis we can create packets with manipulated contents, not only the body of packets but also the header. So if we want to send a spoofed arp reply, we can.
So you should find your target's ip address, this is not the public ip which is same for both of you. To find the active computers on your network you can use the ping command in a loop.
Here is a bash script for it, refer towards the end of the post if you dont know how to execute the code.

The ip 192.168.11 is that of the network which i am using. Replace it with that of your network.
The command ifconfig will help you to find the ip address of your network.


Now execute it. Now wait a few seconds to get the list of hosts who are alive at the moment. Now you should choose a host to perform the attack. Ignore the '1' which is usually the gateway.
And here is another bash script to perform the attack.
Here 'eth0' is my ethernet interface, you can find your by using the ifconfig command. '192.168.11.' is the ip address of my network and 20 is the ip of the host which i want attack. You should replace these values with apropriate ones.
What the script does is, it sends arp reply to 192.168.11.20 saying the mac address of the gateway(192.168.11.1) is '0:1:2:3:4:5' but it is not the actual one but something rubbish(use the command arp on the terminal to see your arp table) and his arp table becomes poisoned, similarly it poisons the arp table of the gateway, these steps are executed in a loop. Since the packets destined for them are having false mac address as destination, adapters at both the systems ignore the packets and both of them cannot communicate with each other, hence  '192.168.11.20' looses his internet connection. After executing it, on success you will get messages saying this


ctrl+z can be used when you want to stop the execution of the script.

To execute the bash script, copy it and paste it in plain text editor and name it as "anyname.sh". Now use cd command to browse to the location of the file, and use the following command to make it executable
sudo chmod +x anyname.sh
Now simply use the command
./anyname.sh

For installing nemesis, you can download the binaries from here
If  "libnet-1.0.2a" is not installed in your system you should install it before  nemesis. Click here to download it.
If you don't how to compile and install these binaries then use google.


tags:-arp, poisoning, DOS, nemesis, ping, host, scan, ping, mitm

Friday, 28 June 2013

The Arp Protocol

This will be a theoretical introduction on DoS attack on LAN and Arp (Adress Resolution Protocol)

When a system on a LAN want to communicate with with another computer on the LAN it sends the data packet into the network, usually the packet will be accepted only by the destination. It is accomplished by the means of mac addresses(we are considering networks using ethernet). Mac address is a unique 6 byte of combination which is written into the hardware which cannot be modified (but can be spoofed :-D). So what usually happens is the source and destination of a data packet is present in the header of the ethernet packet. Systems on the LAN examines the header of each and every packet and only accepts the packet which has destination address matching its own address. The actual communication takes place with the help of mac address. So even if we know the private ip address of a system in a LAN we can send data to it only if we know its mac address. The arp protocol is used to interlink the mac and ip address of systems. If a computer want to know the mac address of system of known ip address it sends an arp request to the broadcast address(so that all systems will receive the data). The corresponding system with the ip address which is present in the arp packet responds to the arp request with a reply telling what is its mac address to the sender. On recieving the arp reply the the mac-ip combination is entered into arp cache, which is a table mapping ip address with mac address. This entry is used for further communication.
When a system want to communicate with the outer-world(say facebook.com), packets will be sent to somewhere called default gateway, the gateway routes it, and after going through a series of routers the packet will reach the destination, similarly the reply (from facebook) reaches your system.

So far everything is good, but there is a serious problem, it is due to the arp protocol. When a system receives an arp-reply it will enter the combination it received into arp-cache without checking whether it asked the sender, this is the default behavior of the system. So if somebody wants to make your arp-cache holding wrong combination when you are using LAN, they can.
So what can be done is, somebody can send a spoofed packet to you saying that the gateway has a mac address which is not its actual one. Similarly he can lie to the gateway about your mac address and doing so, you will loose your network connection, this is a form of denial of service attack. The behavior of the gateway varies, it will either refresh the arp-cache with a default one after some time or keeps it for ever, in that case you will loose your internet until you manually correct it. So we will see how somebody manages to do so.
In the next post we discuss about arp-poisoning at the practical level.


Tags:-arp, poisoning, cache, mac, address, Dos, LAN

Friday, 1 March 2013

Break Into Linux Systems Undetectably

 Introduction 

We wil be using a live linux usb, if dont know how go here and learn to make one.
http://greyhatsspeak.blogspot.com/2013/01/creating-live-linux-usb.html

We are going to boot in from a live usb and access the os in the hard disk with root privileges and edit the file storing the password information. We will use pre-calculated hash of a password and use it to edit the password.
  
We will be dealing with breaking into linux os at the practical level only, to understand what is actually going on it is highly recommended that you read the article below.
http://greyhatsspeak.blogspot.com/2013/02/user-authentication-in-linux.html

So first we will use the crypt() function to generate the hash of a string which we want to set as password. Here is the code, If you dont want to do the program-compilation part browse down and use the pre-calculated hash.

ATTACK

We are simply using a preset salt as it has nothing to do with our password. To compile it first copy and paste the code into a plain text file(say at desktop) and name it to hash.c. Now open terminal and use cd command to goto the folder where you placed the c program.
Compile it using the command

gcc -lcrypt -o hash hash.c

Now the compiled file will be named as hash.
To obtain the hash of a string, type at the terminal

./hash "password"


Replace password with the new password you want to set. Now you will get  a long combination of some character just copy it

If you want to use ready-made hashes, here is a few
password           hash
      a                               $6$srH15BRC$WHvbRrqIMDe3Nc38pTwTxFrHPVBVlIdNs0.R/oqsM5Devh4aTkyLIA.RuPGURzfntVcumO6QpDqKcrc6rG12h.


Now at terminal type

sudo nautilus  

This will launch a file browser with root permissions, now browse to the hard disk where the linux is installed you can find the hard disk at the side pane.
goto /etc folder
Now just backup the shadow file to somewhere if you need to reset the old password back after use(maybe you want to install a back-door in it). Now open the shadow file and find the row containing the username, you will see some fields separated by semicolons, now we want to replace the second field(just after username) with the previously copied hash.


The work is over now boot from the hard-disk and login using your new password!!

Dont forget to make it clean after use, just put back the shadow file which you have backed-up. Again use the command sudo nautilus at the terminal to do it.


tags:hack, linux, ubuntu, undetectable, shadow, hash, salt, crypt, live, usb, password, reset, change

Wednesday, 13 February 2013

User Authentication In Linux


INTRODUCTION

How does the OS identify if the user has supplied the correct password each time he logs in? Is the actual password present in the hard disk?
Lets take a look at this, the password supplied by the user is hashed and is stored at some location, irreversible functions are used to convert the password to hashes (Actually hashing is the process of converting data into something rubbish). ie the passwords cannot be retrieved directly from the hash even if we manage to hack out the file, storing hashes. At the time the user supplies the password the OS hashes the supplied passwords and compare it with the stored hashes and will find out whether it is the correct password.

I said there is no direct method to crack the hashes, but there are indirect ones.  
So one of the methods to crack the password will be to use a pre-calculated hash table to search for, and find the hash and the corresponding passwords.
Those tables are called rainbow tables. They contain passwords and the corresponding hashes. This method will be feasible only if the user uses dictionary words or its modifications as their passwords. As it is not possible to store the hash of every possible random code.
 Another method would be to hash every possible combination of characters one by one and compare it with the hash to crack. This is called Brute-forcing. This method will be feasible only if the user uses small passwords, long passwords can take years to crack, number and speed of processors is an important parameter.

                                                                    THE LINUX OS

In almost every modern linux distro the password is hashed and stored in the /etc/shadow file. You need root permissions to open it. It would look something like this.


Let us analyse the entry
Each field is separated by columns, some of them are empty.

root:$6$7gPuSkeH$jZjYFagMRWDnxx1sDkaRHSX/PO.tzE9F7eaKG8ezVPiAoWuOmxcjIvJ985svUFqXNfOzS2w744bkpWMaZNnB6.:15590:0:99999:7:::

The first entry is the user-name here it is "root"

The next one is the password information  "$6$7g......NnB6."

The next entries are related to password expiration and is less important and we wont cover it here.

Now let us look at the password information, the password information itself divided into 3, delimited by $.

First one is encryption method used here it is $6$, the 6 represents sha-512 encryption. Other possible values are.
            
              $1$      -- Denotes MD5 algorithm being used
              $2a$    -- Blowfish algorithm
              $5$      -- SHA-256 algorithm


Next field contains the salt generated by the OS at the time of encryption. The salt is a string (here it is 7gPuSkeH). The salt is simply appended to the supplied password and the combination is hashed. The salt is used because hash obtained will be that of hash-password combination which is a long, out of dictionary, word and hence the hash will not be vulnerable to brute-forcing and dictionary attacks.

The next field is a long hash of the password-salt combination obtained by any one of the above encryption algorithms, the function crypt() is used to generate it. In terminal use the command man crypt for more information about it.

So when you create a an account, the system generates a random salt and stores along with it the above information into shadow file (\etc\shadow). When a user supplies a password at the login screen the system hashes using the encryption algorithm and salt stored in the shadow file and compares the obtained password with the stored hash (in shadow file), if the hashes match the user is allowed to log in, else not.

Understanding these techniques now we will hack into any linux account that too undetectable, wait for the next post.


tags:- ubuntu, linux, shadow, /etc/shadow, brute, forcing, dictionary, attack, salt, crypt, crypt(), encryption, sha-512, sha-256, md-5, hash, username, password, information

Saturday, 2 February 2013

Changing Windows Admin Password

             So now you have a usb with live linux in it (If not then go here and learn how to make one http://greyhatsspeak.blogspot.in/2013/01/creating-live-linux-usb.html).
I have tried this method upto windows 7 and found it working. Remember dont use this for unethical activities, breaking into somebodies computer without permission is simply 'illegal'.

INTRODUCTION
Have you ever pressed shift key a few times and noticed such a window


What happens is a program called sethc.exe gets executed. It is located at c://WINDOWS/system32/sethc.exe(If 'c' is root directory).

There is another program cmd.exe at the same location which will get executed when we open command prompt. What we are going to do is rename cmd.exe to sethc.exe and access command prompt at at login screen (by pressing shift key five times). Now we will get a command prompt with administrative privileges. And we can simply reset password with a dos command.
The thing is that with a live linux usb you can access the filesystem of windows with administrative privileges, so that we can rename cmd.exe.

THE ATTACK

Boot from the linux-live usb in the system you want to reset password. Go to the drive where windows is installed, then go to the folder  WINDOWS/system32. Now rename the file sethc.exe to some other name (say sethc1.exe). Then rename cmd.exe to sethc.exe. Now restart the machine and boot from the hard disk. At the login screen press sift key 5 times. This will now give you the command prompt.

Now type

net user "username" "new_password"


Here the password of the user buser is resetted to a.

Replace username with the one whose password you want to crack  and password with the new password you want to set. Now close the prompt and login using the new password!!


Tags:- hack, windows, 7, xp, vista, sethc, method, cmd, reset, admin, password, live, linux, usb, sticky, keys, vulnerability, net, user, hacking

Tuesday, 1 January 2013

Creating Live Linux USB


Most of the hacking adventures better performed using linux OS. You can use a live cd or boot-able USB without bothering about things like partitioning hard-drive or formatting it. And USB is highly portable. Another advantage is using it you can crack windows passwords fairly easily, or you can enjoy administrative privileges in any system. As far as the system is not locked mechanically you can operate it.
Here i will you how you can make a live USB. Both from windows and popular linux flavor ubuntu. All you need is the .iso image of the of the OS you can freely download them. Here i am going to create a live USB of ubuntu (download link http://www.ubuntu.com/download/desktop).

Note: the USB will be formatted, the data should be backed up before doing this.
Windows
There are a lot utilities for windows users, but i will prefer "Universal USB Installer". You can download it from  

http://www.pendrivelinux.com/universal-usb-installer-easy-as-1-2-3/

After downloading launch it. Here also select the .iso image and USB device, and the persistence(size to be used by the OS).


Click create and wait for sometime.


To boot from the USB created you need to goto BIOS at the time of startup and change the booting preferences, make the USB the first preference and proceed.


 For Ubuntu Users

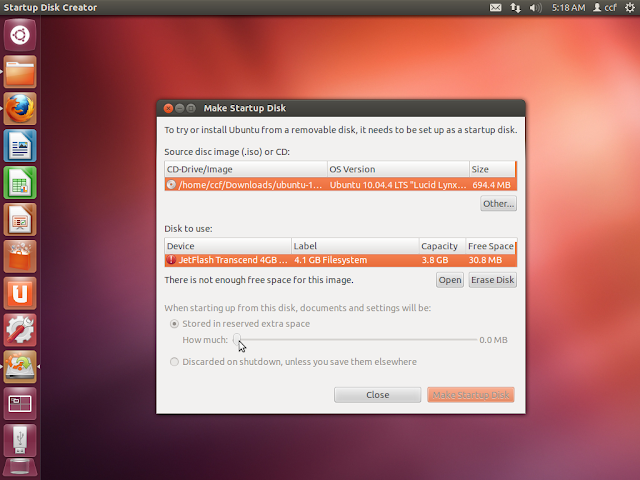
In ubuntu there will be default program called Startup Disk Creator, launch it.


At the CD-Drive/image browse and select your downloaded .iso image. Select the USB drive and erase it.


Below you will see a slide bar, it will allow you to chose how much space should be used by the OS. Choose this depending upon the number of softwares you want to install. Or if you want the changes to be discarded select the button below(Discarded on shut down...). Now click "Make Startup Disk" and wait for sometime.

Tags:- live, linux, usb, ubuntu, boot, windows, linux, persistent, startup, disk, creator, universal, installer,